Saturday, October 18, 2014

Arrowhead


Read more about this block here.

abbreviations
FQ = fat quarter
RST = right sides together
WS = wrong side

general instructions
Seam allowances to be 1/4" throughout.
Pressing instructions assume lighter background (color A).  If inverting the color scheme, reverse the pressing direction.

The main instructions are for a two-fabric block, using strip piecing for the corner 'A' units.  For a scrappy block, see additional notes.

fabric requirements for one block
color A (background):   9 x 44" (1/4 yard) or one fat quarter
color B (main):   7 3/4" x 44" (1/4 yard) or one fat quarter


Color A:
Color B:
For a scrappy version, cut  (32) 2 1/2" squares of color A, and (8) 2 1/2" squares of color B in lieu of the 10" and 20" strips.  Cut (1) to (4) 5 1/2" squares of each color depending on how scrappy you'd like the middle units to be.  The remaining pieces are the same.

Corner units - make 4


Sew (2) 2 1/2" x 20" A strips and (1) 2 1/2" x 20" B strip together lengthwise   A-A-B.  Press seams away from the center strip.
Cut cross-wise into (8) 2-1/2" wide strips sets.
Tip:  slightly longer strips will give some wiggle room for trimming.
Sew together (2) 2 1/2" x 10" A strips and (1) 2 1/2" x 10" B strip together lengthwise A-B-A. Press seams towards center.  Cut crosswise into (4) 2-1/2" wide strip sets.
Arrange into units of three rows each per diagram.  Sew rows together, nesting seams.
Make 4 corner units.
If making a scrappy block, sew 9 individual 2 1/2" x 2 1/2" squares together for each corner nine-patch unit: (6) color A and (3) color B each unit.


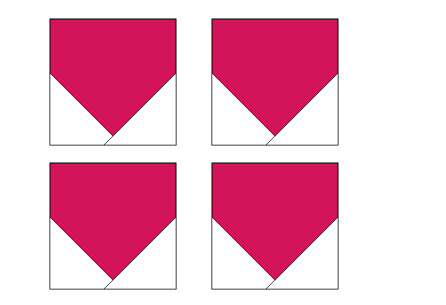
Middle units - make 4


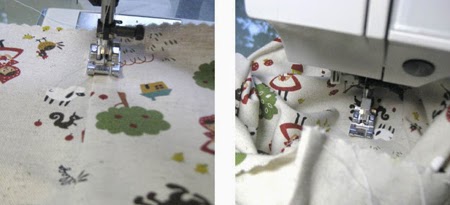
On the WS of each 2 1/2" color A square draw a diagonal line corner to corner.  This is the stitch line.  Place one color A square on a 4-1/2" color B square RST aligned at the corner as shown in the first diagram.  Stitch on the line.  Trim corner and flip open (middle diagram). Press seam towards the larger square.  Repeat for an adjacent corner. 

Make four sets total.
On the WS of each  2 1/2" x 4 1/2" color B rectangle, draw 45 degree diagonal line from a corner to the center of the opposite edge.  Make two rectangles with diagonal line at one side, and two opposite.

Place rectangle RST on top half of an in-progress middle unit as shown and stitch on line. 
Trim corner, open, and press seam away from the center square.


Trim the unit at a 45 degree angle, starting at the side seam line of the lower color A corner and ending at the top of the rectangle, 1/4" in from the side.
Make (2) units with the triangle on right side of block and (2) with the triangle on left side.

On the WS of one 5 1/4" squares draw diagonal line, corner to corner. This will be the CUT line.
Place the 5 /14" squares (one each color) RST. 
Stitch 1/4" to each side of the diagonal line and cut in half on the line.
Press open with seam to the dark side and cut in half again in the opposite direction, perpendicular to the seam.
This will yield (4) two-color triangle pieces.  

For a scrappy block, making more HST units with additional 5 1/4" squares will add variety.
Place one triangle piece on middle unit with color A triangle towards the top, nesting seams. Stitch together.  Press the seam towards the unit center.
Tip:  cut these squares a little large and trim the triangles to size AFTER sewing to the unit base.  As long as the seams are nested when stitching, everything will align.
Repeat for remaining middle units.


The four middle units can also be made by paper piecing.  Download the PDF pattern here.
There are two complete units per 8 ½” x 11 sheet.  Print two copies to make the four units needed for a single block.  Print with no-scaling and double-check the 1" measurement line!

Assemble the nine units as shown, placing the one remaining 4 1/2" square at the center.
Stitch together into rows, pressing seams of the top and bottom rows to the outside and the middle row to the center.  Stitch rows together to complete the block.


Sunday, July 6, 2014

simple tote.

A simple tote that can be made in a short afternoon.

Materials:
(see directions below for sizing options)
15" x 28" light weight canvas or linen/cotton blend for body of bag
9" x 29-1/2" quilt-weight cotton for straps
light-weight interfacing for straps
coordinating thread

A few general notes:
Dimensions are for a finished tote of roughly 14" tall x 12-1/2" wide, with
1-1/8" wide straps and 14" drop.  (Drop is the distance from top of shoulder to top of bag).  Calculations are given below to make totes and straps of different sizes.  Make it a little bigger for trips to the library.  A little smaller for party bags.
The directions include French Seams to neaten up the inside of the tote.  I recommend backstitching at the beginning and end of all stitching to reinforce the seam.

WS = wrong side
WST - wrong sides together
RS = right sides together
RST = right side together

Make the straps!

Method 1  - Folded:
This is my preferred method for making bag straps.  They are quick and durable.

Cut two of strap fabric:
4 1/2" x 29-1/2"
Cut one of lightweight interfacing:
2 1/4" x 29"

      To make a different size strap, cut two each per the following formula:
      Fabric:  length = [2*(drop) + 2 1/2"], width  = [4*finished width]
      Interfacing:  length = [2*(drop) + 2"], width = [2*finished width]

Center the interfacing on the wrong side of the fabric.
Fold in each short end 1/4" and press.

Fold in one side of the fabric at the edge of the interfacing and press along the full length.
Repeat for second side.

Fold in half and press.

Top stitch the folded halves together along the long edge 1/8" from the edge, keeping the edges in alignment as you go.  Repeat along the folded edge.  This helps the strap stay flat and creates a consistent look.

Repeat for second strap.

The straps may feel a little stiff initially - they will loosen up with use.

Method 2 - Tube:  The method uses less fabric, and yields a slightly lighter-weight strap, but turning the tube can be fussy, and it can be difficult to get the strap to lay flat when finished.

Cut two of strap fabric:
29-1/2 x 2-3/4"
Cut one of fusible interfacing:
29" x 2-1/2"


Center the interfacing on the wrong side of fabric and press in place well.
Fold fabric RST.


Stitch in 1/4 seam down the long side, catching the edge of the interfacing to secure it in place.

Using a fabric tube turner (also called a loop turner), turn the tube right-side out.  If you don't have a turner, attach a safety pin to one end of the tube, and work it's way down the inside of the tube, pulling the fabric right side out.

Turn the raw edges to the inside 1/4" and iron the tube flat, with the seam to one side.


Top stitch down both long edges.

Repeat for second strap.

Make the body!

Cut two pieces of the body fabric to 14" x 15".  If the fabric has a clear direction, orient it in the longer dimension.

     To make a different sized tote:
     Add 1 1/4" to the desired finished width and 1 1/2" to the finished length.


Aligning the two pieces WST, stitch along both side edges in a scant 1/4" seam, creating a tube.


Turn the tube WS out and press the seams flat.  I find it works well to roll the seamed edge between my fingers to even out prior to pressing.

With RST, stitch both side seams again.  This time use a 3/8" seam, incapsulating the previous seam.

Press the seam allowance towards one side.


With the tube wrong side out, top stitch on the right side of the bottom layer, 1/4" from the seam line to secure the seam allowance to the bag.   As you work down the length, keep the top layer of the tube towards you, out of the way, and gently smooth the seam apart to keep as flat as possible.  The fabric will form a sort of nest around the needle and look like it's going get stuck, but keep stitching to the end.   Trust me, it works and it's much easier than it sounds!  Repeat for the second side seam.

Turn the bag RS out and stitch along the bottom in a scant 1/4" seam.  Clip the bottom outside edges to a taper at each corner to reduce bulk.

Turn WS out, stitch bottom edge again in a 3/8" seam.  Do not top stitch the seam allowance of the bottom seam.

Assemble the bag!

With bag RS out, turn the top edge of the bag in 1/4" and again another 3/8" - 1/2" to conceal the raw edge.  Press / Pin in place as needed.

Position one strap in a loop,  centered along the bag width, with about 5-6" between straps. (I usually just eyeball this.)  Each end of the strap should overlap on the interior of the bag 1/2" - 1".  Pin in place with two pins, keeping the strap perpendicular to the top edge of the bag.

Test the length and make adjustments as needed.  Repeat for the second strap, aligning it with the first strap.


Top stitch around the top edge, continuing around several times to secure the straps in place and create a decorative edge.   For my Little Red tote, I chose a blue thread to pick up on an accent color in the fabric.


Straight stitch, zig zag stitch, decorative stitch around the top of the tote...the possibilities are pretty endless.  I was fairly sketchy with my stitching to give the tote a more whimsical feel.

And that's it.  A simple tote!

If you make a tote following this tutorial, please post a photo to the lark cottons flickr group!


Friday, November 29, 2013


Turkey's Dilemma

HST = Half Square Triangle Unit
FG = Flying Geese Unit
HQST = Half Quarter Square Triangle Unit


Fabric requirements for a 12” block:

Please note that the dimensions below are for precise piecing.  

I almost always oversize my squares by 1/8” –1/4 “ and trim down to size after sewing.
All seams are 1/4".


Background Fabric
(8) 2-1/2” x 2-1/2” squares
(4) 2-7/8” x 2-7/8” squares  (for HSTs)
(8) 2-1/2” x 2-1/2” squares (for FGs)
(4) 2-1/2” x 4-1/2” rectangles (for FGs)

Color A (corners and center)
(6) 2-7/8” x 2-7/8” squares for HST and HQSTs

Colors B and C
(2) 2-7/8” x 2-7/8” squares each for HSTs
(1) 3-1/4” x 3-1/4” squares each for HQSTs
(4) 2-1/2” x 2-1/2” squares each for FGs
(2) 2-1/2” x 4-1/2” rectangles each for FGs

Make the HSTs!

Using 4 squares of each, pair a color A square with a background square.
Draw a diagonal between two corners and stitch a 1/4" to each side of the line.
Cut apart on the line.  Press seams towards Color A.
Assemble the 4-square corner unit as follows:
Sew an HST to a background square.  Repeat for all 8 HSTs.   The orientation of each HST set must be the same.  Press seams towards Color A.

Sew two pairs together to form the four-square block.  Press half of the seams in one direction, and the others in the opposite direction.  The goal is to have the seams pointing towards the outer edge of the finished block when the corner squares are placed.

Make the Flying Geese!

Draw a diagonal Line on 8 of the 2 -1/2” x 2 -1/2” background squares and (2) each of the Color B and C squares.
Lay a white square over a colored rectangle. Aligned at three sides top.  Stitch ON the diagonal.  Trim off corner, 1/4" from the seam.  Press the seams toward the background.
Repeat on the opposite corner.  Make two of each color.
Make the background geese in the same manner, except sew colored squares onto the background rectangle.  Press the seams toward the background.

Create pairs of geese by sewing coordinating color and background geese together along the “bottom” edge.  Press the seam toward the background.
Make the HQSTs!

Pair up the 3-1/4" color squares, B with C to make an HST.
Draw a diagonal through between two corners and stitch 1/4” to each side.
Cut apart on the line.  Press these seams apart.   

Next, pair up the two-color HST with a color A square .  Aligning a ruler marking with the seam on the HST, cut in half on the opposite diagonal.  [edited to add:] The idea here is to cut exactly perpendicular to the seam line of the original HST by taking advantage of the ruler markings perpendicular to the ruler edge.  The diagram below on the left shows the cut line. 

Stitch the cut edge in a 1/4” seam.  Press these seams open.
Note: making HQSTs from two squares results in alternating orientations – this is want we need for this block!
(It is possible to make these by drawing a diagonal, but I find I have better luck aligning the angles by cutting into triangles first.)

Assemble the center square:
Assemble the block!

Arrange blocks per diagram. 
Sew blocks together as indicated.  Press seams towards the geese blocks.
Sew each row together.  The new seam line should intersect the points.
(This is when I break out the pins, aligning seams and points, and pinning each side of the seam.)

And that’s it!  The Turkey’s Dilemma!