abbreviations
FQ = fat quarter
RST = right sides together
WS = wrong side
general instructions
Seam allowances to be 1/4" throughout.
Pressing instructions assume lighter background
(color A). If inverting the color scheme, reverse the pressing direction.
The main instructions are for a two-fabric block, using strip piecing for the corner 'A' units. For a scrappy block, see additional notes.
fabric requirements for one block
color A (background): 9 x 44" (1/4
yard) or one fat quarter
color B (main): 7 3/4" x 44" (1/4 yard) or one fat quarter
color B (main): 7 3/4" x 44" (1/4 yard) or one fat quarter
Color A:
For a scrappy version, cut (32) 2 1/2" squares of color
A, and (8) 2 1/2" squares of color B in lieu of the 10" and 20"
strips. Cut (1) to (4) 5 1/2" squares of each color depending on how
scrappy you'd like the middle units to be. The remaining pieces are the
same.
Corner units - make 4
Cut cross-wise into (8) 2-1/2" wide strips sets.
Tip: slightly longer strips will give some wiggle room for trimming.
Sew together (2) 2 1/2" x 10" A strips and (1) 2 1/2" x 10" B strip together lengthwise A-B-A. Press seams towards center. Cut crosswise into (4) 2-1/2" wide strip sets.
Arrange into units of three rows each per diagram. Sew rows together, nesting seams.
Make 4 corner units.
Middle units - make 4
On the WS of each 2 1/2" color A
square draw a diagonal line corner to corner. This is the stitch line. Place one color A square on a 4-1/2" color B
square RST aligned at the corner as shown in the first diagram. Stitch on the line. Trim corner and flip open (middle diagram). Press seam towards the larger square. Repeat for an adjacent corner.
Sew together (2) 2 1/2" x 10" A strips and (1) 2 1/2" x 10" B strip together lengthwise A-B-A. Press seams towards center. Cut crosswise into (4) 2-1/2" wide strip sets.
Arrange into units of three rows each per diagram. Sew rows together, nesting seams.
If making a scrappy block, sew 9 individual 2 1/2" x 2 1/2" squares
together for each corner nine-patch unit: (6) color A and (3) color B
each unit.
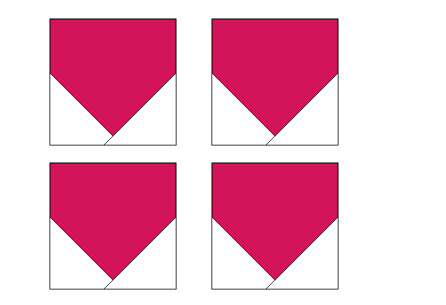
On the WS of each 2 1/2" x 4 1/2" color B rectangle, draw 45 degree diagonal line from a corner to the center of the opposite edge. Make two rectangles with diagonal line at one side, and two opposite.
Place rectangle RST on top half of an in-progress middle unit as shown and stitch on line.
Trim corner,
open, and press seam away from the center square.
Make (2) units with the triangle on right side of
block and (2) with the triangle on left side.
On the WS of one 5 1/4" squares draw
diagonal line, corner to corner. This will be the CUT line.
Place the 5 /14" squares (one each color) RST.
Place the 5 /14" squares (one each color) RST.
Stitch 1/4" to each side of the diagonal
line and cut in half on the line.
Press open with seam to the dark side and cut in
half again in the opposite direction, perpendicular to the seam.
This will yield (4) two-color triangle pieces.
For a scrappy block, making more HST units with additional 5 1/4" squares will add variety.
For a scrappy block, making more HST units with additional 5 1/4" squares will add variety.
Place one triangle piece on middle unit with color
A triangle towards the top, nesting seams. Stitch together. Press the
seam towards the unit center.
Tip: cut these squares a little large and
trim the triangles to size AFTER sewing to the unit base. As long as the
seams are nested when stitching, everything will align.
Repeat for remaining middle units.
The four middle units can also be
made by paper piecing. Download the PDF pattern here.
There are two complete units per 8 ½” x 11
sheet. Print two copies to make the four units needed for a single block.
Print with no-scaling and double-check the 1" measurement line!
Stitch together into rows, pressing seams of the
top and bottom rows to the outside and the middle row to the center. Stitch rows together to complete the block.


No comments:
Post a Comment